Automating Application Provisioning with Copilot Studio’s New Agent Builder

Writer

The role of AI in enterprise development is shifting rapidly from conversational assistance to direct task execution. With the new Agent Builder in Microsoft Copilot Studio (currently in Preview), developers can configure agents that act as active contributors to the software development lifecycle — not just describing what to build, but building it.
Instead of producing documentation, we can configure a Developer Agent that generates consistent, deployable Power Platform solutions, handling both the backend data schema (SharePoint lists) and the frontend Canvas App UI (Power Apps YAML).
This is a practical, end-to-end walkthrough. We start with an agent that generates deployable artifacts you run by hand, then evolve it into an agent that executes the provisioning itself for true zero-touch deployment.
What You’ll Build
By the end you’ll have a single agent that can take a prompt like “Build an Asset Management System” and:
- Phase 1 (manual): generate a ready-to-run PnP PowerShell script for the SharePoint backend and Power Apps YAML for the frontend screens.
- Phase 2 (automated): call a Power Automate Tool that provisions the SharePoint lists and columns directly — no copy/paste required.
Prerequisites — check these before you start: - A Copilot Studio license (or trial) with Preview features enabled for the environment. - A Power Platform environment where you can author agents and flows. - A SharePoint site where your account has at least Member (Edit) permission to create lists.
- For Phase 1 backend: the PnP.PowerShell module installed (
Install-Module PnP.PowerShell) and an Entra app registration with a Client ID. Since the shared PnP Management Shell app was retired,Connect-PnPOnline -Interactivenow requires your own-ClientId. You can register one quickly withRegister-PnPEntraIDAppForInteractiveLogin. - For Phase 2: permission to create a Power Automate flow that uses the SharePoint connector.
1. Initializing the Developer Agent
The journey begins in the Copilot Studio preview environment. When you create a new agent, the foundational step is defining its persona and core instructions. For this use case we define an AI Canvas App Builder Agent whose explicit goal is to generate deployable Power Platform solutions.
Paste this into the agent’s Instructions field as a starting point:
Model selection matters for structured output. When the agent is producing strict JSON, REST payloads, and indentation-sensitive YAML, lighter models tend to drift on syntax. Switch the agent’s foundational model from the default to a higher-reasoning model (in my testing, Claude Opus 4.7 held YAML indentation and JSON schemas together far more reliably than the lighter default). You’ll find this under the agent’s Settings → Generative AI / Model options. Available models evolve in Preview, so pick the strongest reasoning option offered to your environment.
2. Phase 1: Generating Artifacts You Deploy by Hand

In the first iteration the agent produces deployable artifacts — a script and a YAML file — that you execute. The agent isn’t connecting to anything yet; it’s generating code from its instructions.
“Skill” vs “Tool” — the distinction that drives this whole article. In this phase the agent’s capabilities are instruction-driven: it generates text (code) based purely on its prompt and knowledge. It does not touch your tenant. In Phase 2, we attach a real Tool — a connected action (a Power Automate flow) that the agent actually runs. Same agent, two very different modes: describe the work vs. do the work.
We split Phase 1 into two capabilities: a backend generator and a frontend generator.
2.1 The Backend Generator (PnP PowerShell)
Add an instruction block that tells the agent to emit a PnP PowerShell script when the user wants a SharePoint backend:
- Trigger: the user asks to build an app with a SharePoint backend.
- Behavior: produce a script that connects to a target site, creates the lists, defines columns (Choice, Text, Number, etc.), and injects a few sample rows.
The single most effective thing you can do here is show the agent the exact syntax you expect by pasting a reference snippet into the instructions. Here’s a known-good PnP template to anchor it:
Iterative refinement beats one big prompt. Don’t expect perfect output on
the first try. Generate a script, run it, and feed the agent corrections (“the
Title field already exists, don’t recreate it”; “use -AddToDefaultView so
columns show up”). A handful of examples and formatting rules in the
instructions dramatically improves accuracy.
2.2 The Frontend Generator (Power Apps YAML)
Instead of the drag-and-drop maker studio, we have the agent generate the UI as Power Apps YAML — the same source format Power Apps uses on the clipboard when you copy a control, and in pac canvas source files.
- Trigger: the user requests a Canvas App frontend.
- Behavior: generate YAML representing screens (Home, New Request, Admin Dashboard) with controls and embedded Power Fx.
A representative control block looks like this (the format is indentation-sensitive — this is exactly where a stronger model earns its keep):
2.3 Deploying the Phase 1 Output
Backend:
- Copy the generated script into a
.ps1file (or run it directly). - Connect with the SharePoint Online Management Shell / PnP PowerShell — remember the
-ClientIdrequirement above. - Run the script to provision the lists, columns, and sample data.
Frontend:
- Create a blank Canvas app and add your newly created SharePoint lists as data sources.
- In Power Apps Studio, use the control copy/paste (YAML) path: select a screen/control, then paste the agent’s YAML to materialize the controls.
- If you see minor reference errors (e.g., a control points at a screen that doesn’t exist yet), fix them in the formula bar — they resolve in seconds once all screens are pasted.
Reality check on YAML paste: full multi-screen reconstruction from YAML is still a Preview/evolving experience and is sensitive to exact indentation and control schema. Treat the agent’s YAML as a strong scaffold you finish in Studio, not a guaranteed one-shot import. Paste screen by screen and resolve reference errors as you go.
3. Phase 2: Zero-Touch Provisioning with a Tool
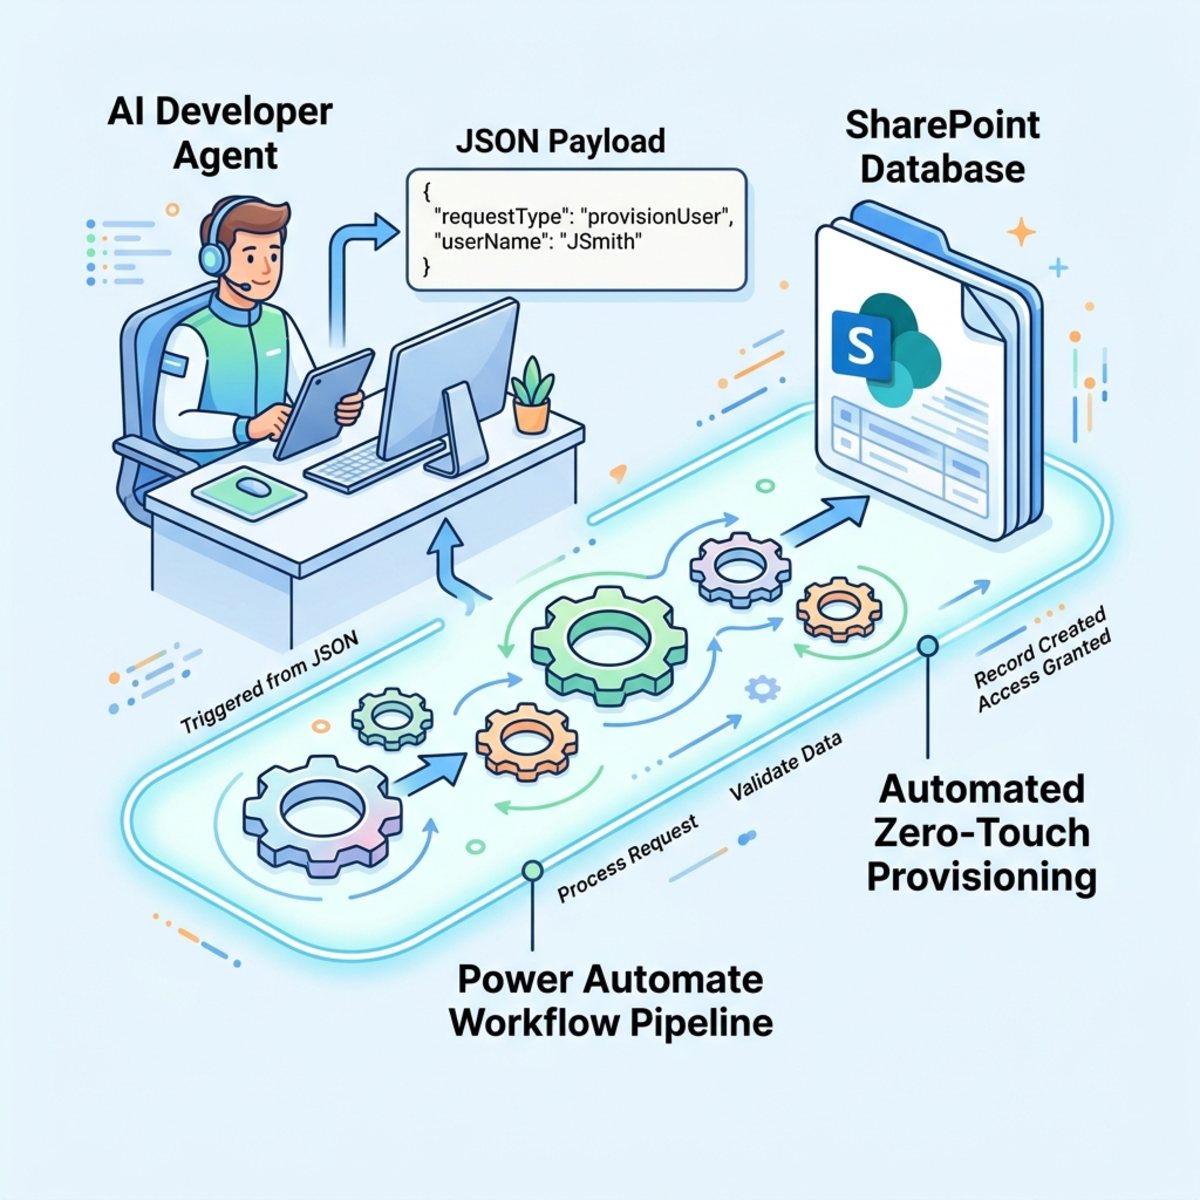
Copy/paste is a huge time-saver, but the real win is when the agent executes the provisioning itself. To do that we replace the generated PowerShell with a Tool — a Power Automate flow the agent calls directly.
Step A: Build the “List Generator” flow
Create a Power Automate flow that does the heavy lifting of SharePoint provisioning.
Trigger: use the “When an agent calls the flow” trigger (the Copilot/Power Apps V2-style trigger) and define two inputs:
| Input | Type | Description (this text is what the agent reads to map parameters) |
|---|---|---|
SiteUrl | Text | The full URL of the target SharePoint site, e.g. https://contoso.sharepoint.com/sites/AssetMgmt. |
ListDefinition | Text | A JSON array of lists to create. Each item has listName and a columns array of { name, type, choices? }. |
Parse the payload. Add a Parse JSON action on ListDefinition with this schema:
Create each list. Add an Apply to each over the parsed array. Inside it, add Send an HTTP request to SharePoint:
- Site Address:
SiteUrl - Method:
POST - Uri:
_api/web/lists - Headers:
Accept: application/json;odata=nometadataandContent-Type: application/json;odata=verbose - Body:
Create each column. Add a nested Apply to each over columns, with another Send an HTTP request to SharePoint:
- Uri:
_api/web/lists/getbytitle('@{items('Apply_to_each')?['listName']}')/fields - Body (Text column shown; set
FieldTypeKindper the table below):
| Column type | FieldTypeKind |
|---|---|
| Text | 2 |
| Multi-line text (Note) | 3 |
| Number | 9 |
| DateTime | 4 |
| Boolean (Yes/No) | 8 |
| Choice | 6 |
Choice columns need a different endpoint. The simple /fields POST works cleanly for Text/Number/DateTime. For Choice (and Lookup) columns, use createfieldasxml, which accepts a full field schema in one shot:
POST it to _api/web/lists/getbytitle('Assets')/fields/createfieldasxml. Branch on columns/type with a Condition or Switch so Choice columns take this path and the rest take the simple /fields path.
Return a result to the agent. Finish with a Respond to the agent action returning a short status string (e.g. “Created 2 lists with 5 columns.”). Without this, the agent can’t confirm success to the user.
Step B: Rewrite the backend instructions
With the Tool attached to the agent, the backend is no longer about PowerShell — it’s about producing a strict data payload and invoking the Tool. Update the backend instruction block:
The agent should emit a payload like this:
Step C: Test it (zero-touch)
Prompt the agent: “Build an Asset Management System.” Here’s the flow you should observe:
- The agent confirms the list/column design, then asks you for the target SharePoint URL.
- On receiving the URL, it generates the JSON payload internally and maps it to the Tool’s
SiteUrlandListDefinitioninputs. - It triggers the List Generator Tool.
- The flow runs in the background and spins up the lists and columns automatically — then reports back the status string you returned in Step A.
If the agent skips asking for the URL, make SiteUrl a required input
and add an explicit line to the instructions (“Always ask for the SharePoint
Site URL before calling the tool”). Required inputs + an explicit instruction
is the reliable combination.
4. Troubleshooting
| Symptom | Cause | Fix |
|---|---|---|
| Flow returns 403 / Access denied | The flow connection account lacks rights on the site | Reconnect the SharePoint action with an account that has Edit/Member on the target site |
| Choice column missing after the run | Choice can’t be created via the simple /fields POST | Use the createfieldasxml branch shown above |
| Agent doesn’t call the tool | Input descriptions are vague, or model drifted | Tighten the input descriptions, mark inputs required, and prefer a higher-reasoning model |
| Agent emits malformed JSON | Lighter model or over-long payload | Add a “validate JSON before calling the tool” instruction; switch to a stronger model |
| Duplicate tool versions appear after publishing | Known Copilot Studio Preview quirk | Cosmetic only — it doesn’t affect execution of the latest iteration. Proceed normally |
| YAML paste shows reference errors | Controls reference screens not pasted yet | Paste all screens, then resolve in the formula bar |
The Ultimate Value Proposition
By configuring a Developer Agent with this hybrid approach — UI generation (YAML) plus automated infrastructure deployment (a Workflow Tool) — organizations can enforce strict design consistency and drastically cut repetitive setup. The agent stops being a conversational chatbot and code-assistant and becomes a functional, task-completing member of the engineering team.
Start in Phase 1 to get comfortable and to keep a human in the loop, then graduate the backend to the Phase 2 Tool once you trust the output. The frontend can stay in YAML-scaffold mode for as long as the paste experience remains in Preview — and you can fold it into a Tool the same way the moment a supported generation API is available.
Read next