Mastering AI Builder: A Deep Dive into Automated Receipt Processing

Writer
Quiz available
Take a quick quiz for this article.

In the era of “Agentic Engineering” and hyper-automation, manual data entry for expense management is a relic of the past. Microsoft Power Platform, via AI Builder, provides a sophisticated pre-trained model specifically for Receipt Processing.
This post explores the technical nuances of implementing this core technology, comparing integration methods, and handling the underlying JSON data for enterprise-grade reliability. This is particularly relevant for common business use cases like employee reimbursement workflows covering stationary, sundry, and travel expenses.
1. Architectural Overview: Two Paths to Extraction
There are two primary integration paths to implement receipt scanning within the Power Platform. Your choice depends on whether you need a real-time UI experience or a background process.
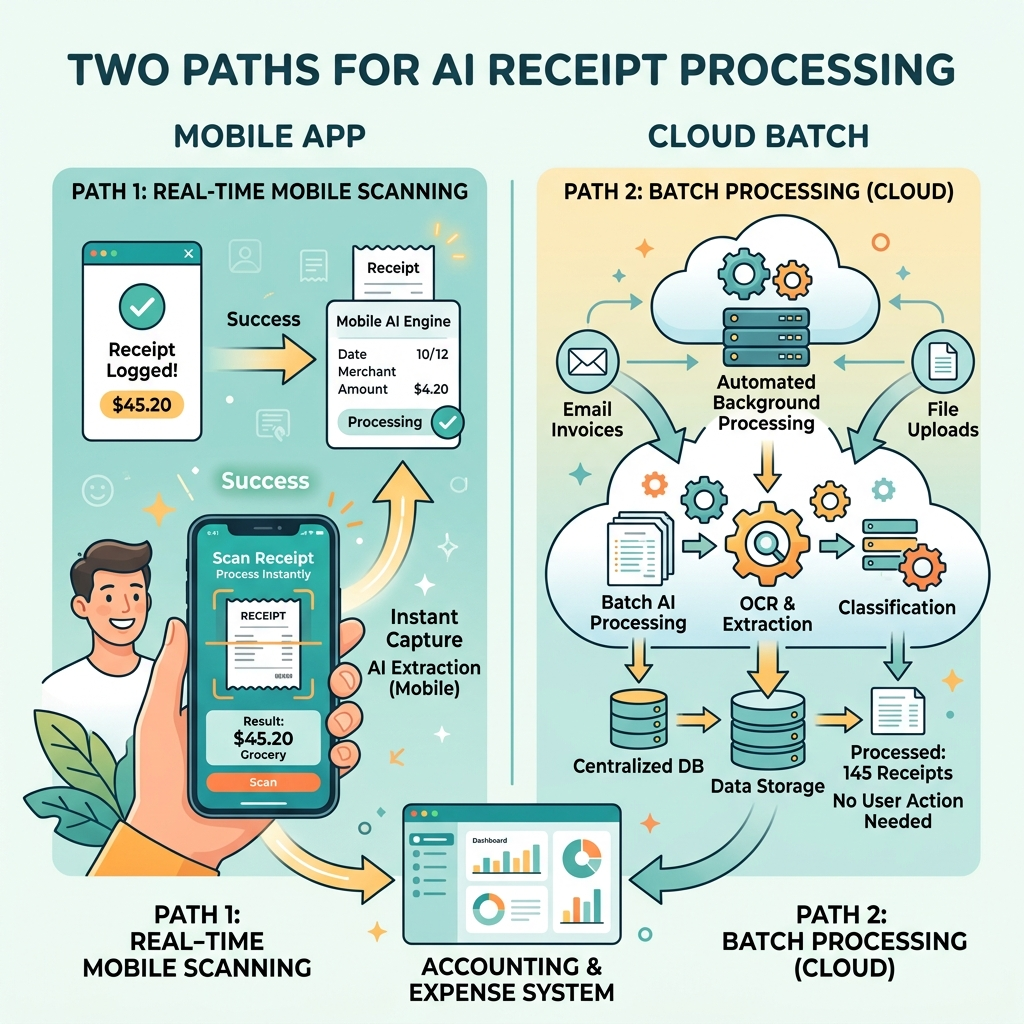
A. The Power Apps Component (Component-based)
For a low-code, UI-first approach, use the Receipt Processor component directly in a Canvas App.
- Best for: Immediate feedback where the user sees extracted values on-screen before submitting.
- Benefit: No need to trigger an external flow for simple extractions.
B. The Power Automate Action (Action-based)
For complex workflows, use the AI Builder “Process receipt” action within a flow.
- Best for: Batch processing, email-triggered expenses, or integration with external ERPs like Dynamics 365 or SAP.
- Trigger: Typically a file upload from Power Apps or an “Incoming Email” trigger.
2. Technical Specifications & Constraints
Before building, you must align your architecture with the model’s physical limitations. Here are the core constraints to keep in mind:
| Feature | Requirement / Limit |
|---|---|
| Supported Formats | JPEG, PNG, PDF |
| Max File Size | 20 MB |
| Page Handling | Single-page processing; only one page is processed at a time. |
The “Pages” Parameter: This parameter is essential for multi-page PDFs. You must specify which page number to scan (e.g., “1”).
3. Deep Dive: The Data Extraction Schema
The “Process Receipt” action requires the content bytes from your trigger as input. But it doesn’t just “read” text; it performs semantic mapping. It identifies the purpose of the text and returns a rich Data Output Schema.
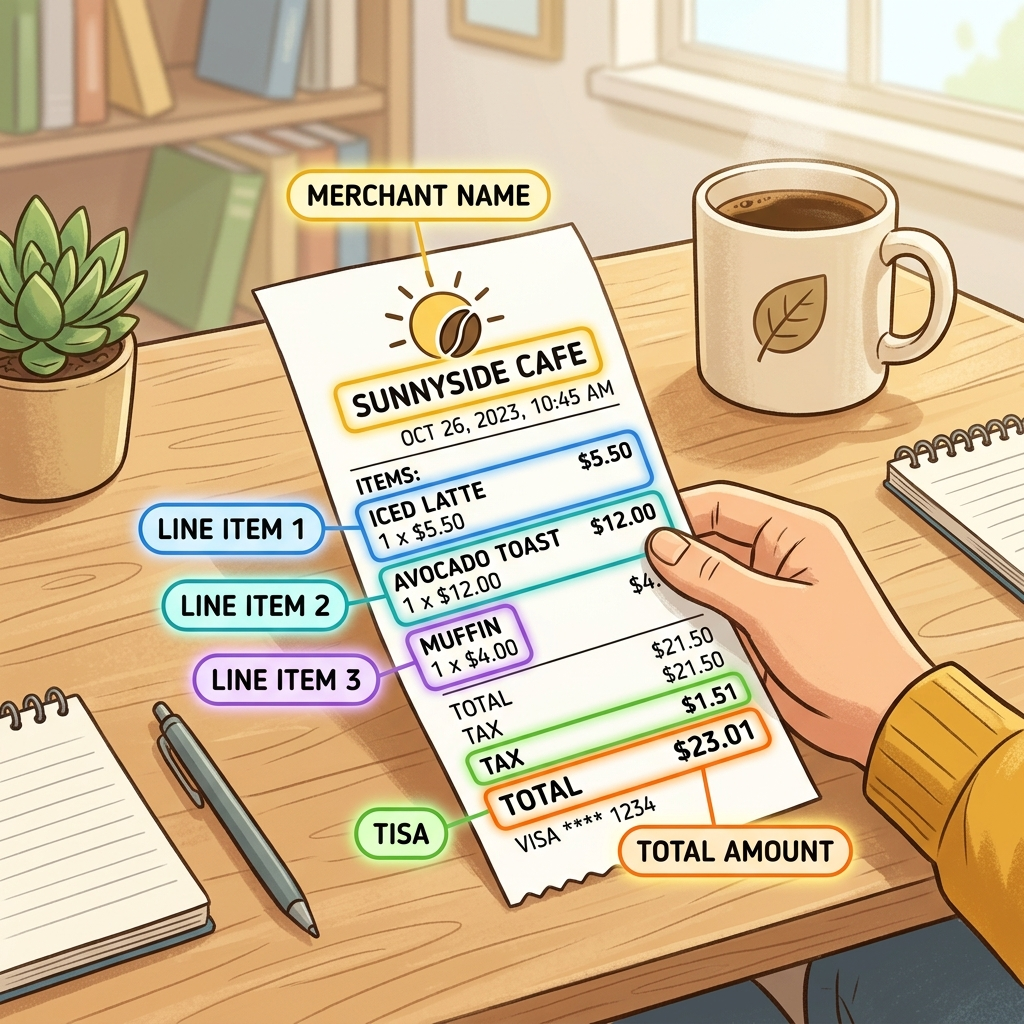
The Standard Fields
The model automatically identifies high-level metadata:
- Header Data: Merchant Name, Address, and Phone Number.
- Transaction Metadata: Date and Time (standardized formats).
- Financial Data: Subtotal, Total Amount, Tax, Tip, and Country/Region (ideal for hospitality/restaurant receipts).
Line Item Extraction (The Item Array)
One of the most powerful features is the ability to extract an array of purchased items (Line Items). For every item, the model returns:
- Name: (e.g., “Lentil Soup”)
- Quantity: (e.g., “2”)
- Individual Price: (e.g., “$3.25”)
- Total Item Price: (The extended price for that line).
4. Real-World Demo Observations: Handling Variance
Receipts vary wildly by merchant. A Coles receipt looks nothing like a Target, Woolworths, or Aldi receipt.
- Format Resilience: The model is trained on diverse layouts. Even if a receipt lacks a clear header or uses a non-standard grid, the AI can often infer the merchant and totals correctly.
- OCR Quality: Real-world demo observations prove that the model is remarkably “fabulous” at scanning blurry or low-legibility images.
- Handling OCR “Confusion”: AI can occasionally be confused by layout quirks. For example, a quantity number “16” placed near a price might be misidentified as part of the financial subtotal or amount.
5. Developer Tips: JSON Structure Analysis & Validation Logic
When the flow runs, the prediction output is returned in a structured JSON format (Response V2 vs. Prediction Output). The predictionOutput contains the readResults. This is where the raw OCR data lives, including the bounding boxes of where the text was found on the image.
The Role of Confidence Scores ($0.0$ to $1.0$)
Every piece of data extracted comes with a Confidence Score. Developer Tip: Do not treat AI output as 100% factual. Use these scores for your validation logic.
Best Practice: Implement manual review thresholds in your flow. If the confidence score for a critical field like the “Total Amount” is below 0.70 (70%), route the receipt to a human in the Finance Department for manual verification.
6. Implementation Summary

To build an end-to-end reimbursement solution, follow these steps:
- Capture: Use a Canvas App to upload a Receipt Image.
- Process: Pass the content bytes to the AI Builder “Process receipt” action.
- Validate: Check the Confidence Scores using condition logic.
- Store: Write the validated data into Dataverse or SharePoint.
- Approve: Trigger a Power Automate Approval for the final payout.
By leveraging these AI Builder capabilities, you reduce human error and significantly accelerate the “time-to-reimbursement” for your organization.
Technical Note: Always ensure your PDF inputs are optimized. Since the model only scans the first page by default, use a “Split PDF” logic if your users tend to upload multi-page documents containing different receipts.
Read next