Mastering the 7 Data Operations in Power Automate Cloud Flows

Writer

Mastering the 7 Data Operations in Power Automate Cloud Flows
Whether you are a newcomer to Power Automate or an experienced developer, mastering Data Operations is essential for building efficient, clean, and dynamic Cloud Flows. Data operations allow you to manipulate, transform, and evaluate data without relying on clunky loops or messy variables.
In this guide, we will walk through the seven core Data Operations, complete with advanced tips, tricks, and traps to avoid.
1. Compose: The Ultimate Read-Only Variable
The Compose action is a lightweight, read-only variable that is incredibly versatile.
Core Use Cases:
- Evaluating Expressions: Instead of writing out a date expression in multiple places, use Compose. Input an expression via the Fx menu—like
utcNow('yyyy-MM-dd')—and Power Automate will evaluate it once. You can then use the output of that Compose action throughout your flow for naming files or sending emails. - Storing Static Data: You can use Compose to hold standard text strings or even raw JSON arrays to act as mock data for testing.
Best Practice Tip: Always rename your Compose actions (e.g., “Compose - Current Date” or “Compose - Animal Array”). This makes identifying the correct output in the Dynamic Content menu significantly easier later on.
2. Parse JSON: Unlocking Dynamic Content

When you receive an array of data (whether from a Compose action, an API, or a database), Power Automate doesn’t inherently understand what is inside it. Parse JSON solves this.
By providing a sample of your data (a “Sample Payload”), Power Automate generates a schema. This schema maps out the structure: it identifies objects, lists all the properties (keys), and defines data types (like strings or integers).
Troubleshooting Trick: When the schema is generated, look for the required array at the bottom. It lists all the fields Power Automate expects to see every single time. If your data source occasionally omits a field (like “Habitat”), remove that field from the required list. If you don’t, your flow will fail when it encounters a missing field.
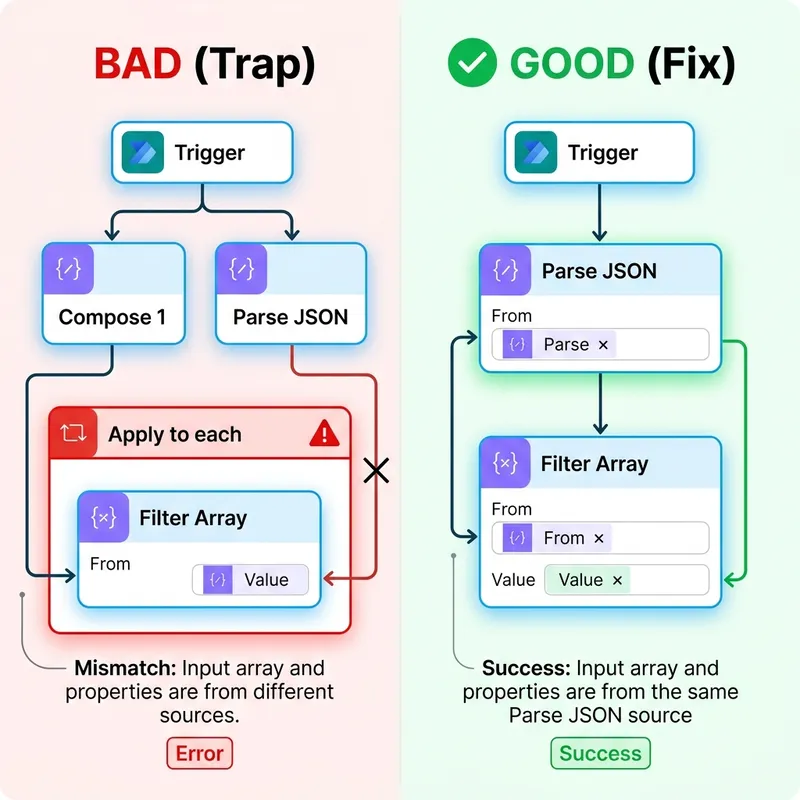
3. Filter Array: Isolating the Data You Need

The Filter Array action takes a large dataset and narrows it down based on a specific condition—for example, finding all items where size is equal to Large.
Trap Alert - The “Apply to each” Loop: If you configure your Filter Array to use the array output from your original Compose action, but select a property to filter on from your Parse JSON dynamic content, Power Automate will automatically wrap your action in an unwanted “Apply to each” loop. This happens because it detects the array and the filter property are coming from two entirely different components.
The Fix: Delete the “Apply to each”. The solution is simple: ensure both the array and the filter property come from the exact same component. Specifically, select the “Body” from the Parse JSON action as your array to filter, and use the properties from that same Parse JSON for your condition. Ignore the original Compose array altogether in this step to keep your flow flat and efficient.
Pro Tip: String comparisons in Power Automate are strictly case-sensitive. To ensure a match even when source data is inconsistent, use the toLower() (or toUpper()) function on both sides of your comparison. For example, instead of matching item()?['Size'] directly to “Large”, compare toLower(item()?['Size']) to toLower('Large'). This simple normalization hack prevents flow failures caused by unexpected casing in customer or third-party data.
4. Create CSV Table: Handling Legacy Formats
For systems that require flat-file ingestion, the Create CSV Table action is your best friend.
Simply pass an array of data (like the output from your Filter Array) into the action. By default, leaving the columns on Automatic will generate a CSV file utilizing all the key-value pairs present in the array. You can also switch to Custom to manually define exactly which columns make it into the final file.
5. Select: The Ultimate Data Transformer

The Select action is arguably the most powerful data operation. It allows you to reshape your data, mapping old keys to new ones and dropping data you don’t need.
For instance, you can take a complex array with 10 columns and reshape it into a clean, 2-column array (e.g., renaming “common_name” to “Name” and “size” to “Animal Size”).
Bypassing the Loop (Again): Similar to the Filter Array trap, if you try to build a Select action using Filter Array data but pull Dynamic Content from Parse JSON, a loop will generate.
The Fix: Build your Select mapping using the Parse JSON Body first to easily grab the dynamic content blocks. Once your mapping is built, go to the “From” input at the top, delete the Parse JSON body, and swap in the Filter Array Body.
Advanced Select Features:
- The Power of
item()?: Under the hood, Power Automate accesses data using expressions likeitem()?['common_name']. The?is incredibly important—it tells Power Automate to gracefully return null if the key is missing, rather than crashing the flow. - Text Mode: By clicking the “Text Mode” toggle on the right side of the Select action, you stop creating key-value pairs and instead create a flat array of strings. This is perfect for extracting a single column (like a list of names or email addresses).
- Ditching Parse JSON: If you are comfortable writing
item()?['fieldName']expressions manually, you can skip using Parse JSON entirely and write your expressions directly into the Select action!
6. Create HTML Table: Presentation Ready
The Create HTML Table action functions almost exactly like the CSV action, but it outputs formatted HTML.
While it has its own custom column mapping features, it pairs flawlessly with the Select action. Simply feed the reshaped, lightweight output from your Select action directly into the Create HTML Table action. This ensures your final table is clean and only contains the exact columns you specifically defined.
7. Join: Combining Array Values
The Join action takes an array of strings (like the one we generated using the Select action’s “Text Mode”) and combines them into a single, cohesive text string, separated by a delimiter of your choice.
The Ultimate Use Case: If you use Select to extract a flat array of user email addresses, you can pass that array into a Join action, using a semicolon (;) as the delimiter. You can then drop the exact output of that Join action straight into the “To:” line of an Outlook email step!
Bringing It All Together
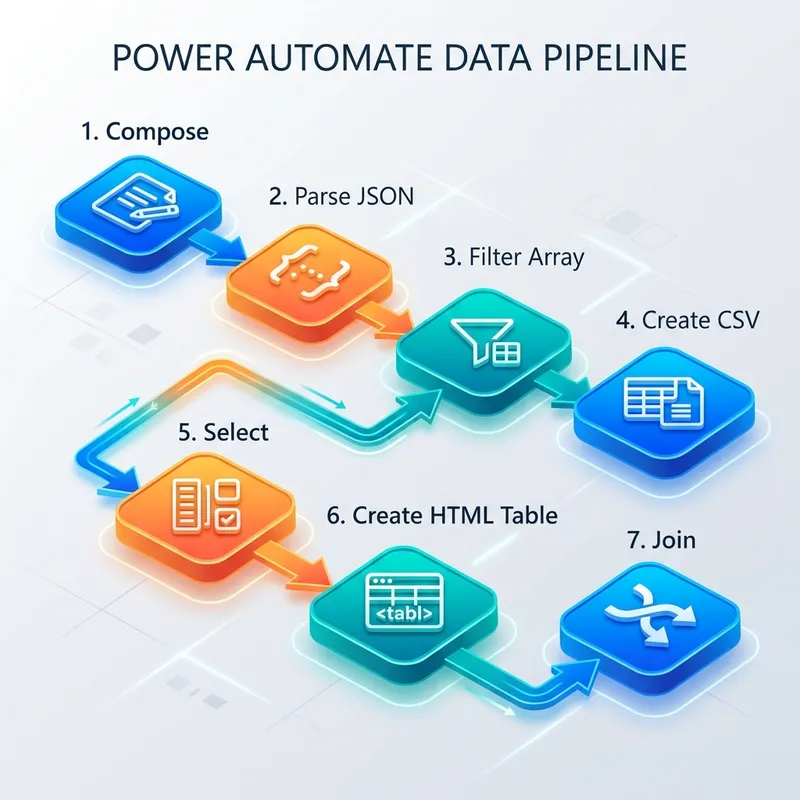
By chaining these seven operations, you can build incredibly robust data pipelines. Here is a typical operational flow:
- Compose an array of raw data.
- Parse JSON to understand the schema.
- Filter Array to isolate the exact records you need (e.g., only “Large” animals).
- Create CSV Table from the filtered data to generate an attachment.
- Select the filtered data to reshape it into a simpler structure.
- Create HTML Table from the selected data to drop into the body of an email.
- Join a specific column (like emails or names) using a semicolon.
Using data operations keeps your flows fast, prevents unnecessary looping, and gives you total control over how your data moves and transforms.
Related Articles
More articles coming soon...